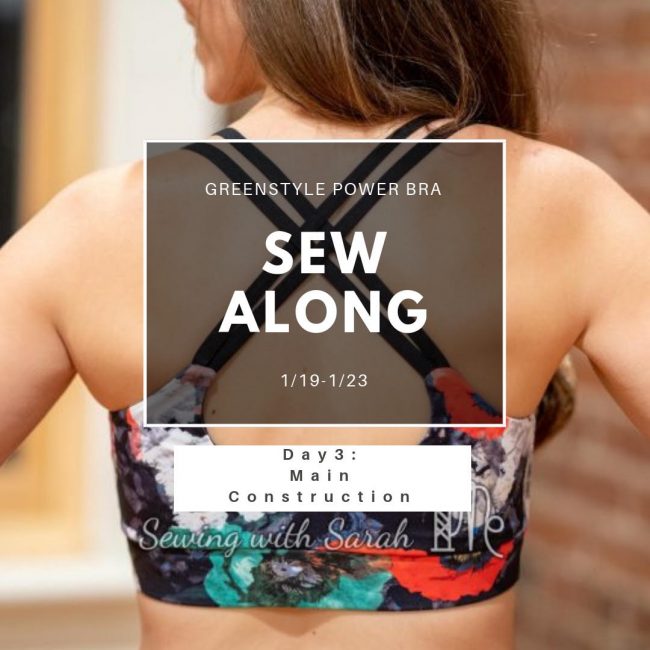
Power Bra SewAlong: Day 3
![]()
![]()
Welcome to Day 3 of the Greenstyle Power Bra SewAlong!
Today we’re really going to get the bulk of construction done on those bras, so grab an extra cup of coffee (you might need it anyway, because Monday…) and let’s get going!
Grab your pattern!
If you haven’t already, you’ll want to purchase the Power Bra pattern! This is a really excellent pattern with options for everyone! If you’re curious about the bra, you can read more about it here, in the official release post!
The Fabric Fairy is also offering bra kits that are specifically designed for this pattern. Kits contain everything you need except your main fabric, and some of the optional items, like bra cups and nursing closures.
If you’ve never downloaded or purchased a Greenstyle pattern, you can find a tutorial on how to do that here.
The Schedule
Day 1: Supplies, Sizing and Cutting
Day 3: Front, Back, Straps and Lining (YOU ARE HERE)
Day 4: Bottom Band
Day 5: Hacks/Finishing
Each day, I’ll post a video and/or blog tutorial with that day’s tasks, and you can comment with any questions and your progress for that day, so we can all keep each other motivated.
At the end, I’ll be choosing a winner for a fun PRIZE! (and who doesn’t love prizes?!)
Sound awesome? It is! (check out my other Sew Alongs HERE on the blog)
Today’s Task: Assembling the Front of the Bra
Today we have a few tasks ahead of us. I’ll have two different videos for you below, depending on whether you are sewing the Racerback or one of the Strappy Options (U Back or Cross Back). In general, we will be:
- Sewing the front to the back
- Sewing the main fabric to the lining
- Making and Sewing in our straps, making fit adjustments as necessary
- Sewing the nursing clip or adjustable strap options
- Finishing the optional keyhole, and adding in the optional racerback pocket
- Adding in clear elastic to give the bra extra support
It sounds like a lot, but it will go by really quickly, promise!
Ready? Let’s get started!
Racerback Option Video:
Strappy Options Video:
Nursing Option Tip:
If you’re making the nursing option, you might want to check out this blog post. Jenn made some awesome nursing options during testing, and she shared a tutorial on her blog for adjusting the bra for narrower nursing clips than the 3/4″ that is called for in the pattern. Even if you have the right size, her tutorial is excellent and a great adjunct to my videos, so I highly recommend checking out her post!
That’s it! I’ll see you back here tomorrow for more sewing! If you’re enjoying these posts, please consider subscribing to my YouTube Channel HERE!
Hi Sarah! The apex of my bust sits slightly outside the front seamlines so I’m wondering about moving those seams to the side slightly. Should I just add to the front center piece and take away from the side piece at the seam line? Also, where do you get the cute decorative elastic? I don’t see other comments so hopefully you haven’t already answered this Q a bunch of times. Thanks.
You could certainly do that, or alter the front in the middle to make it slightly wider. Make sure to adjust your band piece if you do the latter. I got the elastic from a swap meet, but I’ve seen it online as well in some shops.
Hi Sarah, I have two questions. What fabric d you suggest for the lining of the bra? Also, it looks like you used a coverstitch for your topstiching. If I use a regular sewing machine to Topstitch, can I use a regular stitch, or should it be a stretch stitch?Thanks for your tutorial, it’s very helpful,
I’m glad its helpful! I used a variety of fabrics to line my different bras. Some I used the same as the outer (supplex/athletic knit), others I used powernet, and some I used a thinner athletic knit (like circular knit or similar weight of 9oz or less). It depends on the support you want. Heavier is more supportive. I did use my CS machine, but if you are using a regular sewing machine you can use a straight stitch lengthened to 3.0 or 3.5mm. They also make stretch thread which would help prevent popping. Hope that helps!
I know the SAL is over, but I love the videos. I made my first Power Bra today and all went well except for the straps. I had a terrible time getting the clear elastic on. I tried serging – one step; and serging then zigzagging. I got the same results. When I tried to turn the excess elastic (had 3/8 inch only) ripped off and the straps ended up being very stretchy. Advice?
Hey Sarah! I’m following your sew along to make my first Power Sports Bra. Question: I’m making the cross back version, and I just stitched around the neckline, top, and sides. The two spaces between the notches in the back that you (and the pattern) left open for straps 2 and 3 are each WAY wider than the straps themselves. But, when you reached the step where you inserted 2 and 3 into the back, they seemed to fit just right. What am I missing?
Are you making the U cross back option or the strappy cross back option? On the U back, the openings should be just wide enough to insert the straps, so I’d make sure you did the seam allowances correctly. If you did the strappy cross back option, the openings are bigger, to allow for individual placement. Just pin them evenly where you like them (I like mine closer to the middle), and then stitch or serge across.