Day Dream Dress Sewalong: Swim Top/Crop Top Hack
Welcome back! Your DayDream Dresses are starting to take shape and looking very lovely- I wish I could wear them all!
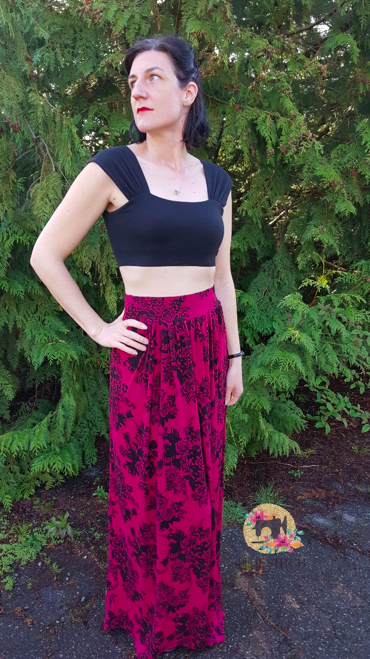
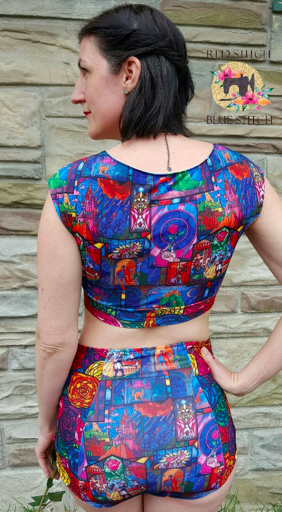
Today, I have a special guest, Rachelle Summers, here to walk us through how to create a swim or crop top. I’ve seen Rachelle’s amazing creations frequently on social media, and I’ve always admired her ability to hack a pattern and make something new and creative from it. When I saw the gorgeous swim suit she made using the DayDream Dress for the top, I gathered my courage and reached out to ask her if she would be interested in contributing to this event, and she accepted!
So, without further ado, here is Rachelle Summers!
Hello everybody! I love the DayDream dress pattern and I’m excited to be here sharing my hack with you. A little bit about me: I’m a stay at home mom of 2. Sewing is my joy, my calm, my thing I do just for the love of creating. I test for G&G, 1 Puddle Lane, P4P/M4M and others here and there. I am officially designing for 5 out of 4 Patterns now, and my first pattern is set to go into testing on the 20th of April. I’m an obsessive fabric collector, inventive pattern hacker and designer, all around lover of everything that gives us the power to create and express ourselves.
Are you interested in making your own crop top or swim top? Let’s go!
Both a crop and swim are made the exact same way with minor differences. I sized my swim top down because when fabric gets wet, it gets looser. My crop I made my regular size.
First we need to alter the pattern to be shorter. I had already made 2 dresses so I put one on and made a mark about a half inch under my bra line. I transferred this mark to my pattern to know where to cut. You could also compare it to another crop top or sports bra, etc in your closet. The important thing is, you can always take length OFF in the final stages, but you CAN’T add it back. So better too long, than too short.
![]()
![]()
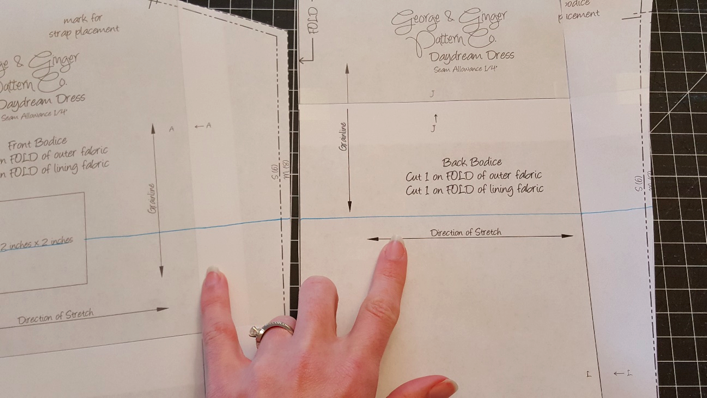
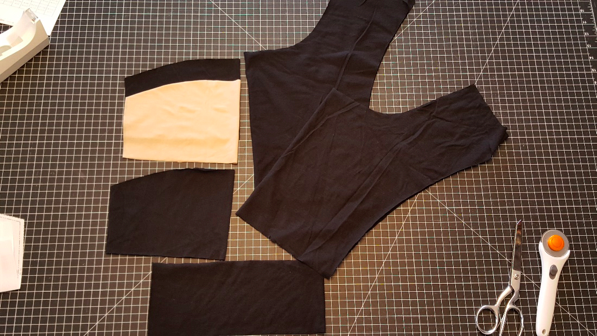
Cut the bottom off your pattern pieces or fold it up out of the way. Cut per pattern instructions EXCEPT cut one extra front. I did my extra in nude lining so that you can see it. For swim, use swim lining or, for more support, power mesh. You are also going to cut a band for under your bust. I made mine 4.5” high so that it will be 2” finished. The length is rather dependent on your under bust measurement. Because I do not like elastic in mine (you could definitely add it for more support), I cut my band about 4” shorter than my under bust measurement. Take a strip of fabric, wrap it under your bust and determine how snug you would like it. Add ½” for seam allowance and cut.
![]()
![]()
If you would like so that you don’t mix up your pieces, baste your middle lining to your other lining pieces. IF YOU ARE MAKING SWIM, I used clear 3/8” swim elastic instead of interfacing. You won’t be able to iron it on. You will have to sew it in. I sewed it on to my basted lining pieces using a zig zag. Make sure you do NOT stretch the elastic or the bodice while stitching it on.
![]()
![]()
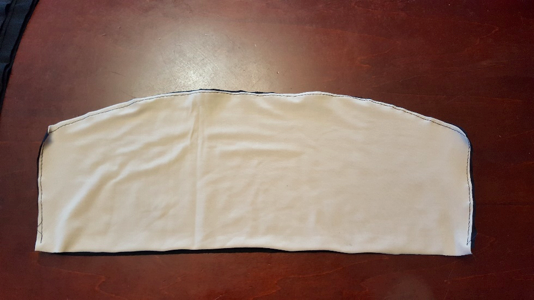
Construct your bodice as per pattern. It will all come together the same way, just your bodice will be shorter.
![]()
![]()
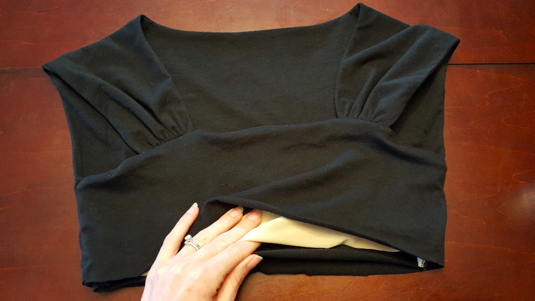
And now we add the cups, if you so desire. Try on your crop top. Fold the outer bodice up out of the way so that you just have the two lining layers over your bust. Slip your bra cups between the two layers and adjust them. You want to make sure that they are evenly placed AND that you have enough fabric underneath to attach your band. This is also the time to assess the amount of fabric under your bust and if you need to shorten it.
![]()
![]()
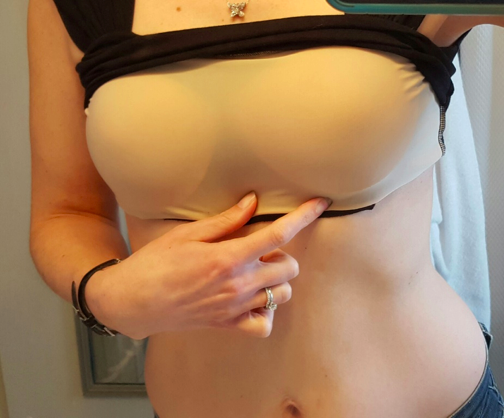
Pin the cups into place on the middle lining, making sure to maintain that fabric underneath the cups. Take off your top CAREFULLY so you don’t poke yourself!
![]()
![]()
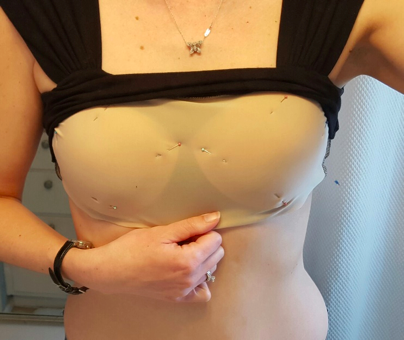
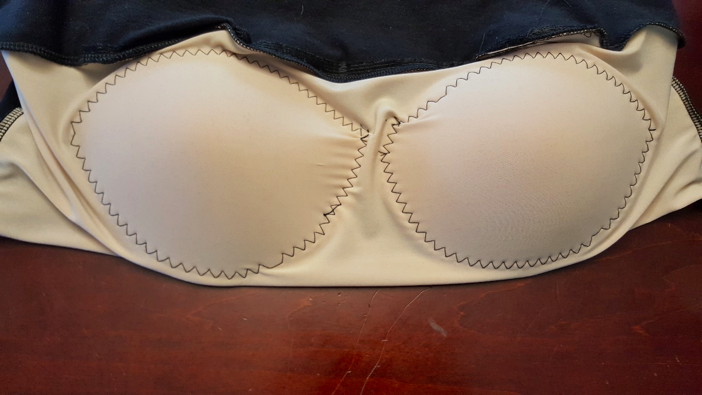
This is the tricky part. Using a wide zig zag, stitch your cups to the middle lining. Go slow, needle down, make sure to move all your other fabric out of the way so it’s just the cups and middle lining. Smooth the fabric over the cups as you go. Remember, NO ONE WILL SEE THIS. It will be sandwiched between two other layers of fabric so as long as your cups are even and there’s no huge wrinkles that will show though, nobody will see what your stitching looks like. Also, as a side note, you do NOT have to sew them in. They will stay within that layer, you’ll just have to adjust them each time you put on your top.
![]()
![]()
Ok! Let’s attach that band. I baste all around the bottom of my bodice. With so many layers, it’s worth the extra step to make sure they all stay together while attaching the band. You will attach your band just like any other band. Sew your short edges right sides together. Fold the band in half wrong sides together, matching up the raw edges. Quarter and pin both your band and bodice and attach stretching only the band and not the bodice. If you want to add elastic, this is where you would do it. I HIGHLY recommend it if you are using less supportive fabrics such as rayon spandex or if you have a large bust. Measure your elastic 1-2” smaller than your ribcage. Overlap the 2 edges by 1” and sew into a circle. Slip it inside the band before attaching it. *If you need help with learning how to sew on a band, there are tons of tutorials out there or ask in the group! The skirt I made the same as in the pattern but instead of attaching it to the bodice, I made a waist band exactly the same way I made the crop band.
![]()
![]()
![]()
![]()

![]()
![]()
[…] you seen the other hacks we’ve covered? Check out the swim top and nursing […]
I love this as a swim top. It is cute while covering. I love the bottom of Rachelle’s swimsuit. is there a tutorial about it? thank you for such a great hack!
The tutorial for the swim hack is the same as the crop top- just use swim fabric instead of regular, and consider sizing down. Hope that helps!
What a great hack!
Thank you! I really appreciate her sharing it with us!