Tabor V-Neck and Moto Inspires
![]()
![]()
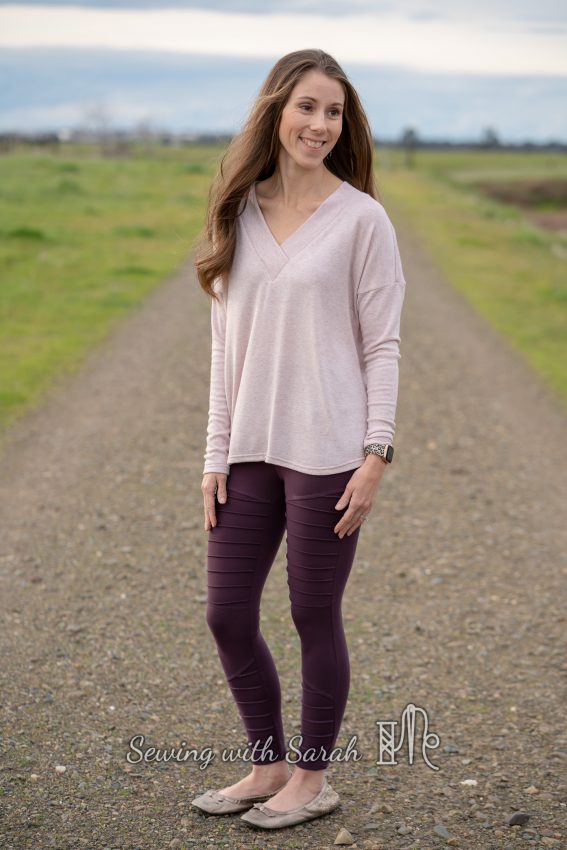
There’s nothing better than combining a tried and true pattern with a brand new one….and finding a perfect match! This sweater/leggings combo gets all the #momiform love from me, and works really well for the weather related whiplash we’ve been experiencing as spring and winter battle it out for supremacy on my weather app (seriously, the forecast changes multiple times per day!).
Moto Inspire Tights
![]()
![]()
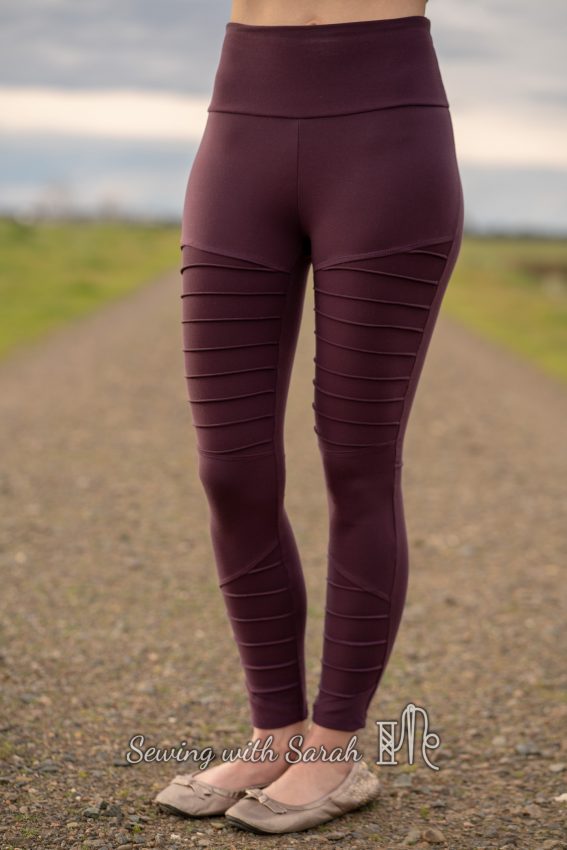
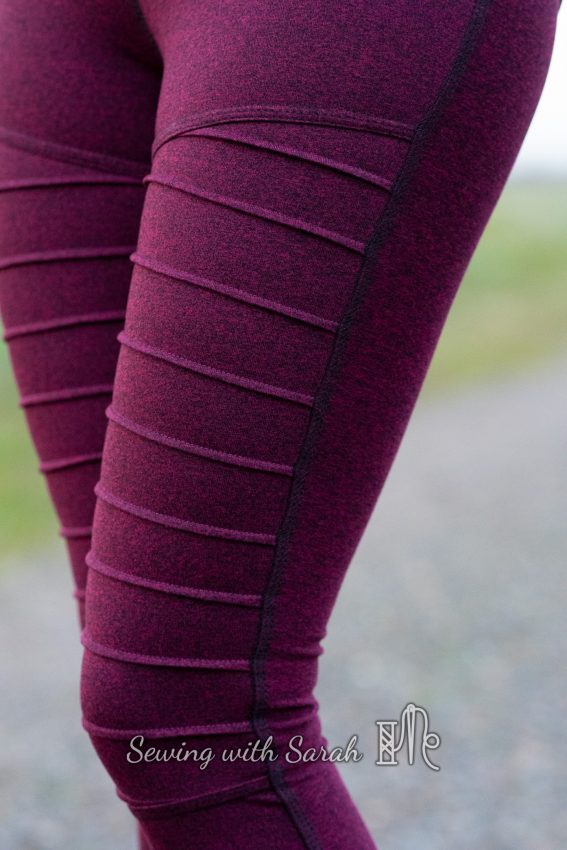
I know what you’re thinking…another Inspire tights hack? Will this lady ever give the poor pattern a rest? It’s true that I had to retrace my pattern pieces because they were showing the strain, but c’mon? Inspire motos? That’s just too good to resist.
Being slightly vertically challenged, I usually struggle to find a good fit in moto pants- the panels never hit me in quite the right places, especially if the pants are full length (99% of my shortness is in my calves, which goes on the list of Strange Things I’ve Discovered About My Body While Sewing).
So, understandably, I’ve been begging (pretty hard) for an Inspire moto hack, and Kayliegh and Angelyn came through for me (and you!) with this awesome hack that includes pattern pieces and fully illustrated instructions! Hacks are fun, but they are out of reach for many beginning sewists, so having a full tutorial and pieces for this makes it accessible to everyone. All you’ll need is the Inspire Tights pattern (aff link), a ruler, and a willingness to hack up some athletic fabric!
![]()
![]()
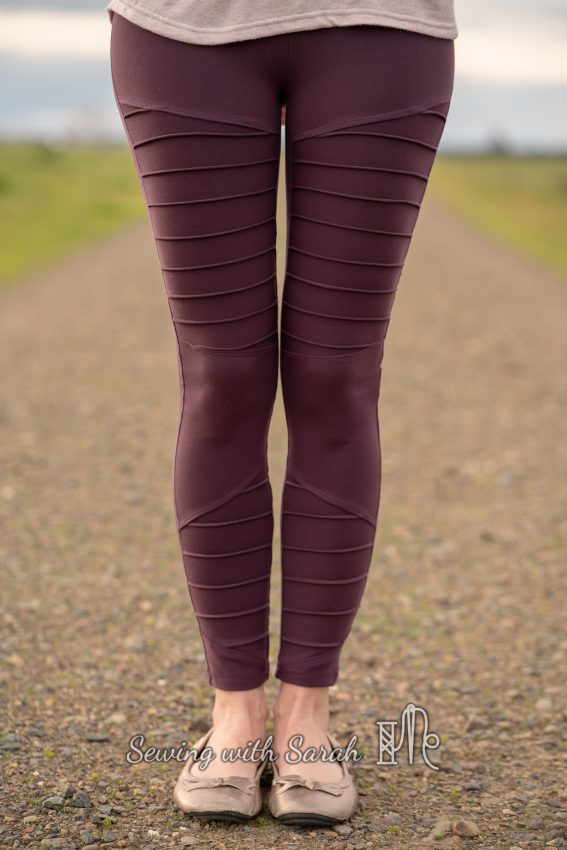
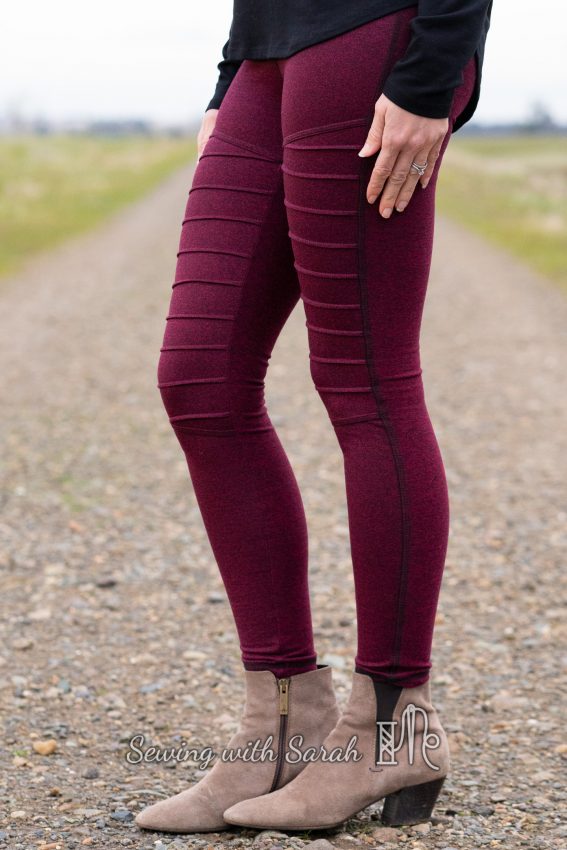
To remedy the panel placement issue I find in Ready to Wear, I moved both panels up 2″, and used the “crop” cut line, which is typically what I sew from on the Inspire pattern to get a pair of full length tights. Greenstyle drafts for 5’8″, so if you’re significantly shorter or taller, you’ll want to adjust accordingly. On my next pair, I’ll move my panels up another inch each, as the seam of the top panel is hitting a little closer to my knee than I’d prefer, but other than that, these are spot on.
![]()
![]()
This pair was sewn in heavy supplex from So Sew English, in the eggplant colorway. I also made another pair of moto Inspires earlier in testing out of this heathered ruby athletic from The Fabric Fairy.
![]()
![]()
You can see that the panel on these goes below the knee, which we changed during testing, but I love these just as much as the eggplant pair, and wear them frequently.
![]()
![]()
The great part about this hack is that, if you would like to take a little creative license, you can adjust the length of the moto pieces, or move them up and down as desired. The technique would even look awesome on the bottom half of the Super G pocket- something I’m itching to try in the near future.
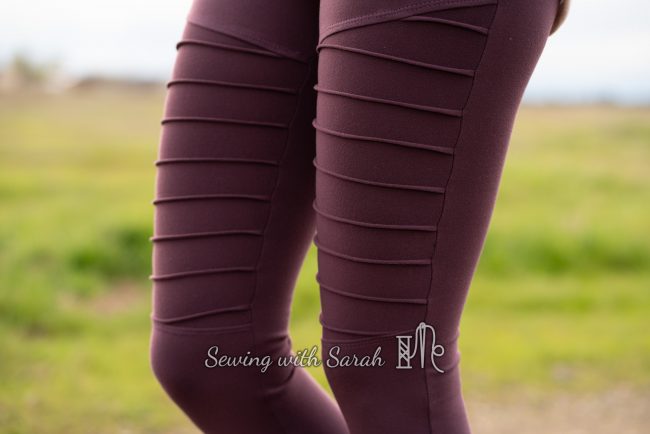
Confession: Sewing these motos was the first time I’d sewn pintucks, and I was admittedly a bit nervous. My first pair (the black) were done with a stretch needle and a longer straight stitch, and while I haven’t popped any stitches, I can see how a stretch stitch (try using the triple stretch stitch if you have one) would be best for durability. I’ll be honest- sewing all those pintucks takes a chunk of time, but it’s so worth it in the end.
Pro tip: Be sure you’re using the same color thread for your bobbin and needle (or looper and needle, if you use a coverstitch machine as I demonstrate in the video below), and press the heck out of those babies! This is pretty much the only time I press athletic fabric, FYI.
Rather than just give in and cue up a few netflix shows, I decided to try and speed it up by using my coverstitch to make the pintucks- and voila! Much, much faster. I demonstrated my technique in the video below- the chain stitch allows for stretch, and the coverstitch sews much faster than I was comfortable going with my standard machine. By chaining the pieces together, I was able to increase my speed even more, so I can crank these babies out assembly line style!
Coverstitching PinTucks Video Tutorial:
Tabor V Neck
![]()
![]()

Every good pair of leggings needs an equally awesome top to go with it, and I was really looking forward to sewing up this dreamy pink sweater knit picked up at the Sew Expo from Style Maker Fabrics. I had the privilege of being in the Style Maker spring blog tour last year , and enjoyed visiting a bit with Michelle at the Expo, taking her class on creating a Spring Capsule. She inspired me to try a few new color combinations, this pink/eggplant combo being one of them.
Another fabulous person I got to meet at the Expo was Peggy, the designer behind Sew House Seven. If you haven’t checked out their designs I strongly encourage you to do so- her boho/casual aesthetic is right up my alley, and Peggy is just a really lovely person. One of the patterns I picked up after meeting her in person was the Tabor V Neck– it’s been out for a while, but this time the wide overlapped v neckline really caught my eye, and I actually purchased the blush hacci knit with this specific top in mind.
![]()
![]()

The fact that I actually sewed it up into my original plan is a bit mind-boggling (I almost always change my mind at the last minute!), but I’m so glad I did, because this is pretty much my favorite sweater ever. I mashed the View 1 and View 4 to get the wide sweather neckline with the curved shirt-tail hem, because I knew I’d be wearing it with leggings or skinny jeans, and I just like a little bum coverage with tight bottoms (so I can wear my granny panties with impunity. TMI? sorry!)
![]()
![]()

The overlapped V neckline wasn’t any harder than the standard V necks I’ve tried, and Peggy gives plenty of notches and tips for getting the process right on your first try. In fact, I was really impressed with her instruction booklet- I’m not a novice seamstress anymore, but there were some great tips in there for everyone, and I’d definitely recommend this pattern to a beginner.
It had been a while since I’d sewn with a “paper” pattern- and I felt kind of naughty cutting directly into the tissue, but the effort of printing/taping/cutting was totally worth it (the Tabor does come in a pdf form, if you’d prefer). The only modification I made was to slim up the sleeves a little- I feel like I look more balanced in a blousy top when the sleeves are more fitted, so I took about 3/8″ off the arm, starting at the sleeve hem and blending to nothing at the dolman seam.
![]()
![]()

I have another sweater knit (also purchased at the expo- thanks mom for loaning me your credit card!) that I dove into right after this Tabor was finished- because one is certainly not going to be enough!
You can find the patterns I used below:
Inspire Tights (required to use the moto add on)
What’s your favorite transitional spring outfit? Drop me some inspiration in the comments!
Note: This post contains affiliate links. Thank you for your support!
I love these, Sarah! That ruby athletic from the Fabric Fairy is gorgeous!! I’m loving loose sweaters and leggings for spring too and give me allllll the granny panties lololol
Sounds like we are on the same wavelength all around! Thank you!
Thanks for the hack!
Which setting did you use on your coverstitch to do the pin tucks?
I just used a single needle chain stitch!
Thanks for this tutorial! I am getting ready to cut my fabric now. I have three questions for you, if you have time to help me 🙂
1. What did you use to mark the lines for sewing on the dark fabric?
2. Which side do you have on the outside on your pin tucks – the chain looper stitch, or the top needle stitching?
3. My pattern pieces for the cut-outs are not matching my Inspire Pattern pieces (they’re too narrow) , so did you just draw them out to make them fit?
Thank you!
Hi Sharon! I’ll try to answer your questions- sorry if my response is a bit late! 1) I use a chaco chalk liner. 2) I use the top needle stitching on the outside 3) Yes, I just made little adjustments so everything lined up.